Hello, Today in this article, we'll learn to create an e-commerce website using HTML, CSS and JS. This is a part of full stack e-commerce website. In this part we'll only create front end page's UI. We'll create 4 pages in this tutorial - Home page, Project Page, Search Page and 404 page.
To see demo or you want full coding tutorial video for better understanding. You can watch the tutorial below.
Video Tutorial
I appreciate if you can support me by subscribing my youtube channel.
Code
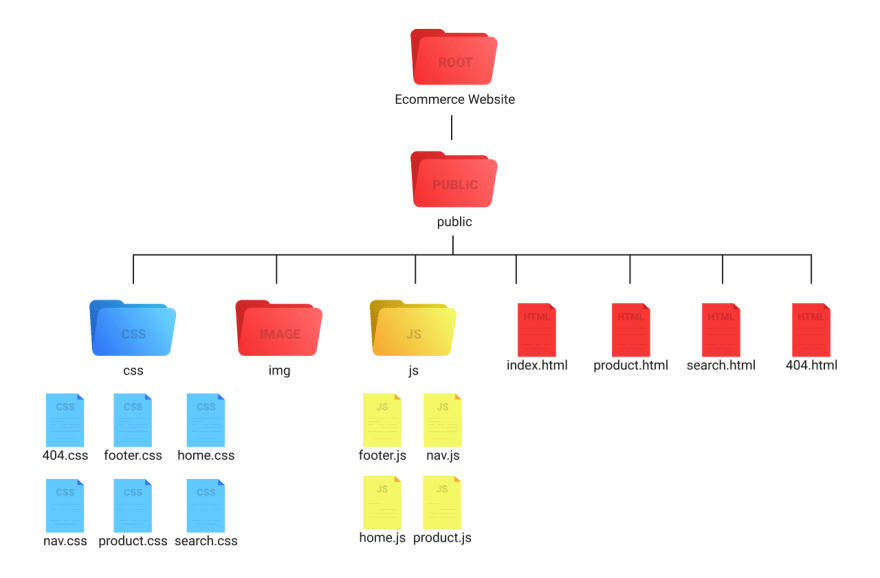
You can see below, our project's folder structure.
Download Images, Get Source Code
So let's start coding.
Home Page
Write basic HTML 5 template in index.html. And link home.css file to index file. Now, create navbar.
<nav class= 'navbar' > <div class= 'nav' > <img src= 'img/dark-logo.png' class= 'brand-logo' alt= '' > <div class= 'nav-items' > <div class= 'search' > <input type= 'text' class= 'search-box' placeholder= 'search brand, product' > <button class= 'search-btn' >search</button> </div> <a href= '#' ><img src= 'img/user.png' alt= '' ></a> <a href= '#' ><img src= 'img/cart.png' alt= '' ></a> </div> </div> </nav>
Open home.css file. And inside it before start styling. As we'll have same navbar and footer in all pages. I thought of making their styles as a separate file. So import nav.js file inside home.css.
@import 'nav.css' ;
And do navbar related styles inside nav.css.
Nav.css
* { margin : 0 ; padding : 0 ; box-sizing : border-box ; font-family : 'roboto' , sans-serif ; } .navbar { position : sticky ; top : 0 ; left : 0 ; width : 100% ; background : #f5f5f5 ; z-index : 9 ; } .nav { padding : 10px 10vw ; display : flex ; justify-content : space-between ; } .brand-logo { height : 60px ; } .nav-items { display : flex ; align-items : center ; } .search { width : 500px ; display : flex ; } .search-box { width : 80% ; height : 40px ; padding : 10px ; border-top-left-radius : 10px ; border-bottom-left-radius : 10px ; border : 1px solid #d1d1d1 ; text-transform : capitalize ; background : none ; color : #a9a9a9 ; outline : none ; } .search-btn { width : 20% ; height : 40px ; padding : 10px 20px ; border : none ; outline : none ; cursor : pointer ; background : #383838 ; color : #fff ; text-transform : capitalize ; font-size : 15px ; border-top-right-radius : 10px ; border-bottom-right-radius : 10px ; } .search-box ::placeholder { color : #a9a9a9 ; } .nav-items a { margin-left : 20px ; } .nav-items a img { width : 30px ; }
Output

Now create links below the navbar.
<ul class= 'links-container' > <li class= 'link-item' ><a href= '#' class= 'link' >home</a></li> <li class= 'link-item' ><a href= '#' class= 'link' >women</a></li> <li class= 'link-item' ><a href= '#' class= 'link' >men</a></li> <li class= 'link-item' ><a href= '#' class= 'link' >kids</a></li> <li class= 'link-item' ><a href= '#' class= 'link' >accessories</a></li> </ul>
Above code is inside navbar element.
.links-container { width : 100% ; display : flex ; padding : 10px 10vw ; justify-content : center ; list-style : none ; border-top : 1px solid #d1d1d1 ; } .link { text-transform : capitalize ; padding : 0 10px ; margin : 0 5px ; text-decoration : none ; color : #383838 ; opacity : 0.5 ; transition : .5s ; } .link :hover { opacity : 1 ; }
Output

Great! but as we want navbar in all pages. I am don't like to copy the code. So let's make this navbar with JS dynamically. Open nav.js file. And make a createNav function inside it.
const createNav = () => { let nav = document . querySelector ( ' .navbar ' ); nav . innerHTML = ` <div class='nav'> <img src='img/dark-logo.png' class='brand-logo' alt=''> <div class='nav-items'> <div class='search'> <input type='text' class='search-box' placeholder='search brand, product'> <button class='search-btn'>search</button> </div> <a href='#'><img src='img/user.png' alt=''></a> <a href='#'><img src='img/cart.png' alt=''></a> </div> </div> <ul class='links-container'> <li class='link-item'><a href='#' class='link'>home</a></li> <li class='link-item'><a href='#' class='link'>women</a></li> <li class='link-item'><a href='#' class='link'>men</a></li> <li class='link-item'><a href='#' class='link'>kids</a></li> <li class='link-item'><a href='#' class='link'>accessories</a></li> </ul> ` ; } createNav ();
If you see the above code, Inside the function first I am selecting nav element using querySelector method. And then writing its HTML using innerHTML. And the value of innerHTML is the same HTML elements that we have made in index.html file. You can now remove the HTML elements from there and also import nav.js.
<nav class= 'navbar' ></nav> <script src= 'js/nav.js' ></script>
Output

Now, let's make its header.
<!-- hero section --> <header class= 'hero-section' > <div class= 'content' > <img src= 'img/light-logo.png' class= 'logo' alt= '' > <p class= 'sub-heading' >best fashion collection of all time</p> </div> </header>
Home.css
@import 'nav.css' ; .hero-section { width : 100% ; height : calc ( 100vh - 120px ); background-image : url('../img/header.png') ; background-size : cover ; display : flex ; justify-content : center ; align-items : center ; } .hero-section .logo { height : 150px ; display : block ; margin : auto ; } .hero-section .sub-heading { margin-top : 10px ; text-align : center ; color : #fff ; text-transform : capitalize ; font-size : 35px ; font-weight : 300 ; }
Output

Now, we have to make product card slider. For that code this.
<section class= 'product' > <h2 class= 'product-category' >best selling</h2> </section>
Note- we are inside
index.htmlfile.
Home.css
.product { position : relative ; overflow : hidden ; padding : 20px 0 ; } .product-category { padding : 0 10vw ; font-size : 30px ; font-weight : 500 ; margin-bottom : 40px ; text-transform : capitalize ; }
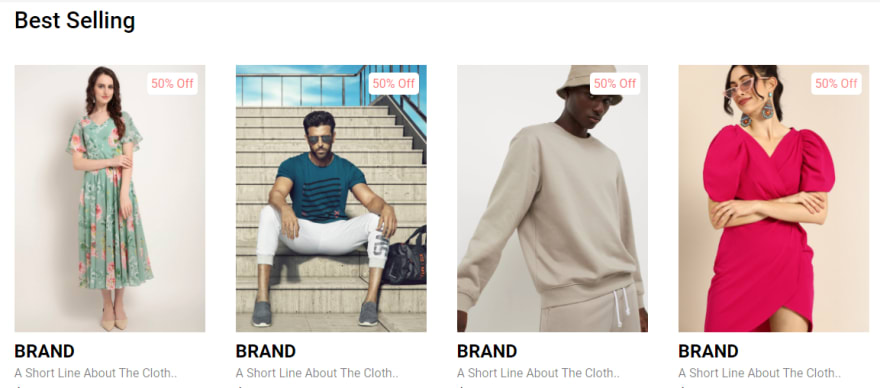
Output

Now make product card.
// inside product section. <div class= 'product-container' > <div class= 'product-card' > <div class= 'product-image' > <span class= 'discount-tag' >50% off</span> <img src= 'img/card1.png' class= 'product-thumb' alt= '' > <button class= 'card-btn' >add to whislist</button> </div> <div class= 'product-info' > <h2 class= 'product-brand' >brand</h2> <p class= 'product-short-des' >a short line about the cloth..</p> <span class= 'price' >$20</span><span class= 'actual-price' >$40</span> </div> </div> +7 more cards </div>
We'll make these product cards with JS and database dynamically later.
Home.css
.product-container { padding : 0 10vw ; display : flex ; overflow-x : auto ; scroll-behavior : smooth ; } .product-container ::-webkit-scrollbar { display : none ; } .product-card { flex : 0 0 auto ; width : 250px ; height : 450px ; margin-right : 40px ; } .product-image { position : relative ; width : 100% ; height : 350px ; overflow : hidden ; } .product-thumb { width : 100% ; height : 350px ; object-fit : cover ; } .discount-tag { position : absolute ; background : #fff ; padding : 5px ; border-radius : 5px ; color : #ff7d7d ; right : 10px ; top : 10px ; text-transform : capitalize ; } .card-btn { position : absolute ; bottom : 10px ; left : 50% ; transform : translateX ( -50% ); padding : 10px ; width : 90% ; text-transform : capitalize ; border : none ; outline : none ; background : #fff ; border-radius : 5px ; transition : 0.5s ; cursor : pointer ; opacity : 0 ; } .product-card :hover .card-btn { opacity : 1 ; } .card-btn :hover { background : #efefef ; } .product-info { width : 100% ; height : 100px ; padding-top : 10px ; } .product-brand { text-transform : uppercase ; } .product-short-des { width : 100% ; height : 20px ; line-height : 20px ; overflow : hidden ; opacity : 0.5 ; text-transform : capitalize ; margin : 5px 0 ; } .price { font-weight : 900 ; font-size : 20px ; } .actual-price { margin-left : 20px ; opacity : 0.5 ; text-decoration : line-through ; }
Output
Now make, pre and next button of course.
// before product-container element. <button class= 'pre-btn' ><img src= 'img/arrow.png' alt= '' ></button> <button class= 'nxt-btn' ><img src= 'img/arrow.png' alt= '' ></button>
.pre-btn , .nxt-btn { border : none ; width : 10vw ; height : 100% ; position : absolute ; top : 0 ; display : flex ; justify-content : center ; align-items : center ; background : linear-gradient ( 90deg , rgba ( 255 , 255 , 255 , 0 ) 0% , #fff 100% ); cursor : pointer ; z-index : 8 ; } .pre-btn { left : 0 ; transform : rotate ( 180deg ); } .nxt-btn { right : 0 ; } .pre-btn img , .nxt-btn img { opacity : 0.2 ; } .pre-btn :hover img , .nxt-btn :hover img { opacity : 1 ; }
Output

Now, let's make the slider working. Open home.js file. And code this.
const productContainers = [... document . querySelectorAll ( ' .product-container ' )]; const nxtBtn = [... document . querySelectorAll ( ' .nxt-btn ' )]; const preBtn = [... document . querySelectorAll ( ' .pre-btn ' )]; productContainers . forEach (( item , i ) => { let containerDimenstions = item . getBoundingClientRect (); let containerWidth = containerDimenstions . width ; nxtBtn [ i ]. addEventListener ( ' click ' , () => { item . scrollLeft += containerWidth ; }) preBtn [ i ]. addEventListener ( ' click ' , () => { item . scrollLeft -= containerWidth ; }) })
In the above code, I am simply selecting all product containers, next buttons, pre buttons using querySelectorAll method. And then just looping through each container. And adding click event to next button and pre button.
Import the home.js file inside index.html.
< script src = ' js/home.js ' >< /script >
We are done with product cards also. Let's make collections section now.
<!-- collections --> <section class= 'collection-container' > <a href= '#' class= 'collection' > <img src= 'img/women-collection.png' alt= '' > <p class= 'collection-title' >women <br> apparels</p> </a> <a href= '#' class= 'collection' > <img src= 'img/men-collection.png' alt= '' > <p class= 'collection-title' >men <br> apparels</p> </a> <a href= '#' class= 'collection' > <img src= 'img/accessories-collection.png' alt= '' > <p class= 'collection-title' >accessories</p> </a> </section>
.collection-container { width : 100% ; display : grid ; grid-template-columns : repeat ( 2 , 1 fr ); grid-gap : 10px ; } .collection { position : relative ; } .collection img { width : 100% ; height : 100% ; object-fit : cover ; } .collection p { position : absolute ; top : 50% ; left : 50% ; transform : translate ( -50% , -50% ); text-align : center ; color : #fff ; font-size : 50px ; text-transform : capitalize ; } .collection :nth-child ( 3 ) { grid-column : span 2 ; margin-bottom : 10px ; }
Output

Now you can copy the product section 2 more times after collection element. And you can also change the images and data. Don't worry we'll make the cards dynamically with database in future.
After done copying product section. The only thing left in our page is footer. So let's make it.
<footer> <div class= 'footer-content' > <img src= 'img/light-logo.png' class= 'logo' alt= '' > <div class= 'footer-ul-container' > <ul class= 'category' > <li class= 'category-title'


No comments:
Post a Comment